

It’s the Saturday after opening weekend, and the deer that was walking around in the woods two days ago is now hanging in your garage, skinned out, cape off, and staring at you like it’s your problem now. Because it is. You’ve field dressed deer before. Maybe you’ve even hung and skinned one. But actually turning that carcass into steaks, roasts, and packages of ground meat that don’t taste like a science experiment gone wrong, that’s a different skill, and it’s the one nobody actually walks you through before you’re standing there with a boning knife wondering where to start.
Most guys either overpay a processor to do something they could learn in an afternoon, or they hack their way through it the first time, ruin half the backstrap, and never try again. Neither has to be your story. Learning to process a deer yourself isn’t complicated, it’s just never explained well. I’ve broken down more deer on my own kitchen table and garage workbench than I can count at this point, in temperatures ranging from a mild 45-degree December thaw to a genuinely miserable 8 degrees in an unheated garage where my hands stopped working halfway through the second hindquarter. I’ve made every beginner mistake in this article at least once, which is exactly why I know what to tell you to avoid.
This guide picks up where field dressing leaves off, deer’s down, gutted, and hung. If you still need that part, read the field dressing guide first, including the section on getting your deer from field to cooler, since it covers proper aging (34 to 40 degrees, three to seven days depending on the deer’s age) in more depth than I’ll repeat here. This guide picks up once that aging window is done and it’s time to actually turn the carcass into meat. By the end, you’ll know the actual order of operations, what tools earn their keep, how to keep the meat safe (this matters more in CWD country than most guides tell you), and what to do with the trim once the primary cuts are off the bone.
The Short Answer: Butchering a deer at home comes down to five stages: skin it, break it into primal sections (front shoulders, hindquarters, backstraps, tenderloins, neck and rib trim), debone each section, trim silverskin and connective tissue, then decide what becomes steaks, roasts, or grind before packaging for the freezer. A whole deer, worked efficiently with the right tools, takes most people two to four hours the first few times and closer to ninety minutes once you’ve done it a handful of times.
What You’ll Need Before You Start
You don’t need a butcher shop’s worth of equipment, but a few tools make the difference between an afternoon that goes smoothly and one that doesn’t. A dedicated boning knife with some flex to it is the single most important tool in the whole process, a dull kitchen knife will fight you every step of the way and is honestly the number one reason first-timers have a miserable time. I go through what actually holds an edge through a full deer if you want the specifics.
Past the knife, you’ll want a grinder if you’re planning to make any of your own burger, and with a lean animal like whitetail, you will be, since almost every deer produces more grind-worthy trim than steak-worthy muscle. I cover what size grinder actually makes sense for a home processor separately, since this is one spot where people either way overbuy or way underbuy. You’ll also need something to package the final product, a vacuum sealer is worth the money the first time you pull a two-year-old package of venison out of the freezer with zero freezer burn, and I go through what to look for in a sealer built for wild game in its own guide. If you’re processing more than one deer a season, or you just don’t trust your kitchen freezer to hold everything, a dedicated chest freezer solves a real problem a lot of hunters don’t think about until their freezer’s already full in October. And if you’re planning to turn any of your trim into jerky rather than just grind, a dehydrator built for the volume and consistency wild game actually needs is worth having before you start rather than improvising with an oven.
Skinning: Getting the Hide Off Clean
If your deer is already skinned, skip ahead. If not: hang the deer by the hind legs using a gambrel, with the hams roughly at your eye level so you’re not working above your head or bent over double. Starting at the inside of one hind leg, slip the tip of your knife under the hide, blade facing up and away from the meat, and run a cut down toward the hock. Repeat on the other leg, then connect the two cuts around the tail.
From there, it’s mostly hand work. Pull the hide down and away from the carcass, using short knife strokes only where the connective tissue won’t let go on its own, pulling too hard where the hide’s still attached tears the meat underneath it, which is a mistake I made plenty of times before I slowed down and let the knife do less of the work than I thought it needed to. Work down toward the front shoulders and neck, and the hide should come off in one piece.
Breaking It Down: The Primal Sections
This is the step that actually turns a deer-shaped object into meat you can work with. Before you make a single cut, it helps to see where everything actually comes from, I built the venison cut chart below because I couldn’t find one that matched how I actually break a deer down, and it’s the same mental map I use every single time.
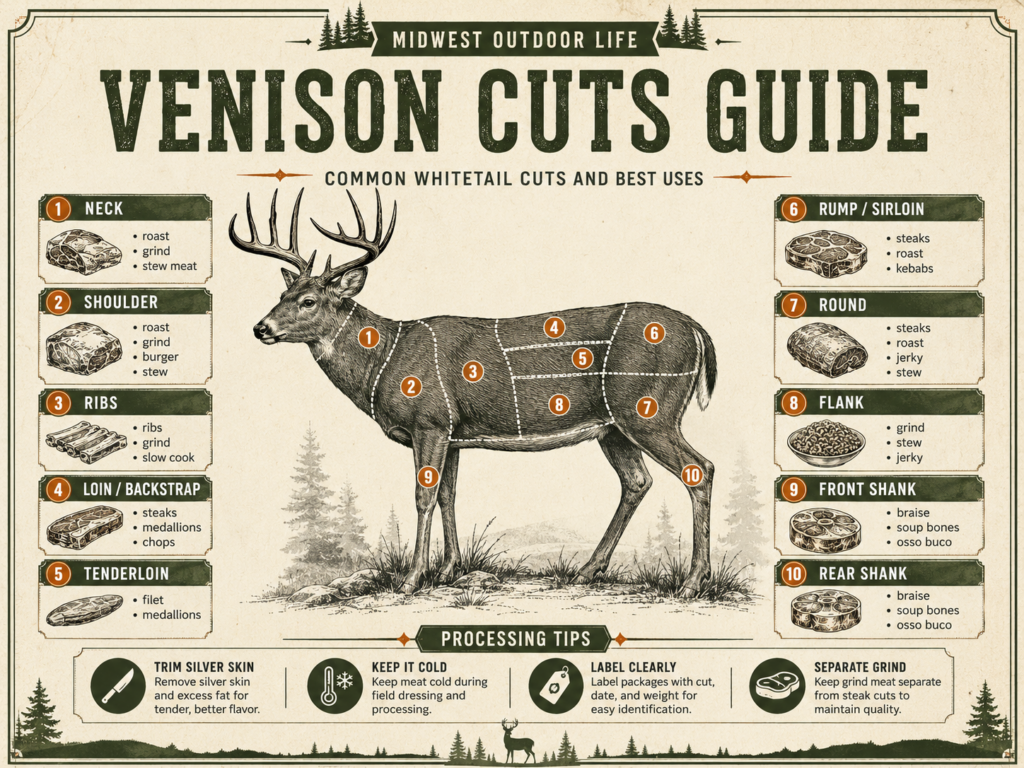
A quick reference for where the shoulder, backstrap, loin, hindquarter, ribs, and shanks come from, worth glancing back at as you work through each section below.
Start with the front shoulders, there’s no bone connection here worth fighting, just a sling of muscle holding the leg to the body. Pull the leg away from the rib cage and cut through that muscle sling close to the body; the whole shoulder comes free in one piece.
Hindquarters take a little more attention because there is a joint involved. Find the ball-and-socket hip joint by feeling around where the leg meets the pelvis, then cut the tendon at that joint, you don’t need a saw here, just a knife and the right spot. Once the joint’s separated, follow the natural seam along the pelvis and the hindquarter comes off whole. This is also where most searches for “how to cut up the hind quarter of a deer” land, if that’s specifically what you’re stuck on, it’s the joint-first approach above, not the saw, that makes this easy.
The backstraps run along either side of the spine and are the easiest cut on the whole animal to mess up by rushing. Run your knife along the spine from the back of the ribs to the hip, then peel the muscle away from the bone in one long strip rather than sawing at it. Don’t cut these into steaks yet, leave them as full sections. You’ll thank yourself later when you can decide medallions, full steaks, or a whole roast at thaw time instead of being locked into whatever thickness you cut today.
Don’t forget the tenderloins, the two small strips inside the body cavity along the inside of the spine, near the hips. These get missed constantly, especially by first-timers who field-dressed in a hurry, and they’re arguably the best meat on the whole animal.
Deboning
Working section by section rather than trying to debone the whole deer as one project keeps this from feeling endless. On the shoulders, the meat comes off the bone reasonably easily if you follow the natural seams between muscle groups instead of cutting straight through them, let the knife find the gaps rather than forcing a straight line. Hindquarters work the same way: separate along the muscle groups (you’ll feel where one ends and the next begins) rather than slicing indiscriminately, and you’ll end up with clean, identifiable roasts instead of a pile of stew meat you didn’t intend to make.
Trimming Silverskin and Connective Tissue
That thin, shiny membrane covering parts of the muscle is silverskin, and it does not break down with cooking, it just stays chewy no matter how you prepare the meat. Slide your knife blade at a shallow angle just underneath it, angled slightly up into the silverskin rather than into the meat, and peel it away in strips. This is slow work and it’s tempting to skip on trim that’s headed for the grinder anyway, but leftover silverskin is one of the most common reasons home-processed venison gets a reputation for being tough or gamey when the actual problem was just poor trimming.
Deciding What Becomes What
Not every cut deserves to be a steak, and treating every scrap of meat like it does is how you end up with freezer bags of stringy, chewy “steaks” nobody wants to cook. Backstraps and tenderloins are your best meat, steaks, medallions, or whole roasts. Hindquarter muscle groups can go either way depending on size and how clean the trim came out: bigger, cleaner sections make good roasts; smaller or more sinewy pieces are better as stew meat or grind. Shoulders, neck meat, and rib trim are almost entirely grind material, there’s nothing wrong with that, and honestly, most of what you’ll actually cook and eat through the winter is going to be ground venison in one form or another.
Because whitetail is so lean, straight ground venison can come out dry, especially in anything cooked past medium. The fix is simple: ask a local butcher counter to set aside some beef fat, and grind it in at roughly a three-to-one or four-to-one ratio of venison to fat using a grinder sized for the volume you’re actually processing. It’s a five-minute phone call and the right equipment that solves a problem a lot of people just live with instead of fixing.
Packaging for the Freezer
However you’re freezing it, air is the enemy, freezer burn is caused by moisture escaping into air pockets around the meat, not by the meat itself going bad. A good vacuum sealer solves this more completely than butcher paper or freezer bags, though either works fine if you’re diligent about pressing out excess air before sealing. Package in meal-size portions rather than large blocks; you’re not going to thaw five pounds of ground venison to make two burgers, and repeated partial-thawing is its own food safety problem. If you’re filling up more than a shelf or two, that’s usually the point where a chest freezer earns its keep instead of fighting your kitchen fridge-freezer for space all winter. Label everything with the cut and the date, “venison, 2026” from the back of the freezer a year from now tells you nothing useful.
Making Jerky or Sausage From Trim
If you’re set up for it, trim scraps and smaller cuts that aren’t clean enough for grind-quality ground meat make excellent jerky. I’d point you to what actually works in a dehydrator built for jerky rather than repeat all of that here, but the short version worth knowing before you start: homemade jerky has a real food safety issue if it’s just air-dried without hitting a proper internal temperature first, which I get into more in the section below.
Common Beginner Mistakes
The single most common mistake is a dull knife, people fight the meat for two hours with a blade that hasn’t been sharpened since it came out of the box, decide butchering is miserable, and never try again. Sharpen or strop before you start, not after you’re already frustrated.
Second is rushing the backstraps into pre-cut steaks before deciding how you actually want to cook them. Once they’re cut, that decision’s made for you.
Third is skipping silverskin trim on anything headed for the grinder, on the theory that it’ll get chopped up anyway. It doesn’t fully break down in a grinder the way people expect, and it’s a real source of the “gamey” texture people blame on the deer instead of the trim job.
Fourth, and this one’s specific to where you’re hunting: skipping lymph node awareness entirely. More on that below.
What This Means for Southeast Minnesota and Driftless Area Hunters Specifically
If you’re processing a deer taken in the southeastern corner of Minnesota, zones 601, 604, 605, or the expanding SE cluster, you’ve already read about carcass movement restrictions and testing requirements in the field dressing guide, so I won’t repeat the zone mechanics here. What’s specific to the butchering stage, once the deer’s actually in front of you on the table, is lymph node identification and tool decontamination, and this is the part most national butchering guides skip entirely, because they’re not written by anyone actually processing deer out of an endemic zone.
Lymph nodes accumulate the prions responsible for CWD, so identifying and removing them during processing matters even outside a mandatory testing zone, according to the University of Minnesota’s CWD Watch program. They show up clustered around the neck, the inside of the front shoulders, and along the spine, pea-to-marble-sized, firm, distinct from the surrounding muscle once you know what you’re feeling for. I treat every SE Minnesota deer the same way regardless of which DPA it came from, since the disease doesn’t respect permit-area boundaries and neither should your caution.
The other habit worth building at the butchering stage specifically: the University of Minnesota’s research notes that a one-to-one mixture of household bleach and water, with five minutes of contact time, is effective at breaking down CWD prions on stainless steel tools and surfaces. I run my knives and table through this at the end of every processing session now, not because I’ve had a positive test, but because it’s a five-minute habit that costs nothing and the alternative, reusing contaminated tools on next year’s deer, isn’t a risk worth taking for the sake of skipping a step.
What If Something Goes Wrong
The meat smells off before you even start cutting. This usually means the deer wasn’t cooled fast enough after the kill, not that the meat itself is inherently bad. If the carcass sat above 40°F for an extended period, especially during an early-season warm spell, trust your nose, if something smells sour or off before you’ve even started, it’s not worth the risk of finding out why the hard way.
You cut into the stomach or intestines during field dressing and it’s already tainted part of the meat. Trim generously around the contaminated area, when in doubt, cut away more than you think you need to. A little wasted meat is a much better outcome than a foodborne illness.
You’re behind schedule and the deer’s been hanging longer than planned in warm weather. If daytime temps are pushing 50°F, don’t wait for ideal aging conditions, bone the deer out and get it into a cooler or refrigerator immediately. Rushed processing beats spoiled meat every time.
You’re making jerky and you’re not sure it’s actually food-safe. This is a real concern, not an overcautious one, Penn State Extension documents past Salmonella and E. coli outbreaks caused by improperly dried jerky, even batches that were dried at seemingly reasonable temperatures for extended periods. The safe approach is heating the meat to a proper internal temperature before or during the drying process, not just air-drying and hoping, worth reading through fully before your first batch rather than guessing.
Looking For More
Once you’ve got a freezer full of venison, here’s the gear that actually earns its keep at each stage of getting there:
- Best Deer Processing Knife Sets — nothing else in this guide works if the knife doesn’t hold an edge through a whole deer.
- Best Meat Grinder for Home Processing — worth it the moment you realize how much of your deer is headed for the grind pile, not the steak pile.
- Best Vacuum Sealer for Venison — the difference between venison that’s still good in two years and venison you’re throwing out from freezer burn.
Your first couple of times, budget two to four hours for a full deer, start to finish. Once you’ve done it a handful of times and know the muscle seams without hunting for them, most people get it down closer to ninety minutes to two hours.
The only genuinely non-negotiable tool is a sharp, flexible boning knife. A grinder and vacuum sealer make the process faster and the end product better, but plenty of hunters processed deer for decades with just a knife, some freezer paper, and patience.
Don’t eat meat from an animal with visible abnormal growths, lesions, or anything that looks off, most CWD-positive deer appear outwardly normal for most of the infection period, so the absence of visible symptoms isn’t a guarantee, but visible abnormalities are always a reason to get the animal tested rather than process and eat it.
USDA food safety guidance recommends cooking venison to a minimum internal temperature of 160°F, though many experienced wild game cooks prefer whole muscle cuts like backstrap closer to 120–130°F for tenderness, accepting a different risk tradeoff. Ground venison specifically should always hit the higher temperature, since grinding distributes any surface bacteria throughout the meat.
That’s a personal risk decision the DNR doesn’t make for you, the carcass movement restrictions govern transport, not consumption. Many hunters wait for a confirmed “not detected” result before eating, which is the more cautious approach given what’s still not fully understood about CWD’s transmission risk to humans.
